Como fotografar o eclipse solar em segurança
Não arrisque danificar a câmara do seu telemóvel
Fotografar o Sol sem filtro adequado pode danificar o sensor da câmara.
A lente do telemóvel concentra a luz solar no sensor, tal como uma lupa concentra a luz num ponto. Por isso, nunca deve apontar a câmara diretamente para o Sol sem proteção apropriada.

O "truque do Sol & Salvo":
O filtro: Cole um par de óculos Sol & Salvo sobressalentes sobre as lentes da câmera do seu telefone.

Desligue o flash
O flash não terá qualquer utilidade para fotografar o eclipse.

Use um tripé! Conforme a luz diminui, sua câmera tentará manter o obturador aberto por mais tempo, resultando em fotos borradas tiradas sem tripé.


Este guia é para fotografia com câmeras DSLR/Mirrorless.
Capturar um eclipse solar é o "Super Bowl" da astrofotografia. É uma tarefa de alto risco, tecnicamente exigente e que oferece uma janela de oportunidade que dura apenas minutos ou até segundos. Abaixo, você encontrará um guia de campo profissional para conseguir a foto perfeita, desde a preparação do equipamento até o momento crucial da totalidade.
A regra principal: segurança primeiro
Antes de falar de abertura, velocidade ou ISO, é essencial falar de segurança.
Proteção visual:
Nunca olhe diretamente para o Sol durante as fases parciais sem óculos certificados para observação solar.
Proteção do sensor:
Nunca aponte uma câmara, telescópio ou binóculo para o Sol sem um filtro solar adequado colocado na parte frontal da lente ou do dispositivo.
Exceção:
O filtro só deve ser removido durante a totalidade, quando o Sol está 100% coberto — e apenas em locais onde a totalidade seja efetivamente observável.

Equipamento recomendado
Equipamento recomendado
Câmeras e lentes
Corpo: Uma DSLR ou Mirrorless com controle manual completo (M). Câmeras com sensor APS-C oferecem maior alcance sem custo adicional.
Distância focal:
< 200 mm: Muito amplo para um disco solar detalhado, mas perfeito para fotos ambientais (paisagem com o eclipse no céu).
400 mm - 600 mm: O "Ponto Ideal". Você obtém um grande disco solar, mas deixa espaço suficiente no enquadramento para a coroa solar (que se estende muito além do sol).
800 mm ou mais: Bom para proeminências e contas de Baily, mas você corre o risco de cortar a coroa externa.
Suporte: Um tripé robusto é indispensável. Se estiver usando uma lente teleobjetiva pesada, certifique-se de que a cabeça esférica não esteja inclinada para trás.
O Filtro Solar
Tipo: Utilize um filtro "Eclipse Shade" (certificado ISO 12312-2).
Posicionamento: Deve ser colocado na parte frontal da lente. Nunca use um filtro de encaixe próximo ao sensor; o calor concentrado dos elementos da lente irá queimá-lo.
Certifique-se de ter o filtro do tamanho correto para a lente que você pretende usar! (76 mm / 100 mm etc.)

Foco e preparação
Concentração (Faça isso cedo)
O foco automático terá dificuldades contra um céu escuro.
Foco manual: Mude sua lente para MF (foco manual).
Visualização ao vivo: Ative a visualização ao vivo (com o filtro solar LIGADO).
Zoom: Aumente o zoom digital na borda do Sol (o limbo) ou em uma mancha solar.
Trave o foco: Ajuste o foco até que a borda fique extremamente nítida. Em seguida, pegue um pedaço de fita adesiva e prenda o anel de foco. Não o toque novamente.
Filtro de fase ISO Abertura Velocidade do obturador Observações
Status
Fotômetro de ponto, 100mm f/8, 1/500 - 1/2000, com a lente voltada para o sol. A fase deve estar brilhante, mas não superexposta.
Diamond OFF 100 f/8 1/1000 - 1/4000 Obturador muito rápido. O sol está incrivelmente brilhante aqui.
Totalidade DESLIGADA 200 f/8 BRACKET! Crucial: Fotografe em uma faixa de 1/4000 até 2 segundos.
Por que usar o bracketing durante a totalidade? A coroa solar tem uma enorme amplitude dinâmica.
Obturador rápido (1/1000): Captura as proeminências solares vermelhas e a coroa interna.
Obturador lento (1s): Captura a tênue e difusa coroa externa.
Você precisará de todos esses elementos para criar uma composição HDR profissional posteriormente.
Sequência de fotografia durante o eclipse
Fase 1: Eclipse Parcial (C1 a C2) Filtro: LIGADO. Ação: Esta fase dura mais de uma hora. Fotografe a cada 5 a 10 minutos para criar uma sequência em time-lapse. Verifique a bateria; não deixe que o Live View a descarregue antes do evento principal.
Fase 2: Aproximação da Totalidade (A Zona de Perigo) Filtro: DESLIGADO (aproximadamente 15 segundos antes da totalidade). Ação: Conforme o último raio de sol desaparece, você verá as "Contas de Baily" (luz penetrando pelas fendas lunares) e o "Anel de Diamante". Técnica: O modo de disparo contínuo é seu aliado aqui. Mantenha o obturador pressionado. Esses fenômenos duram apenas alguns segundos.

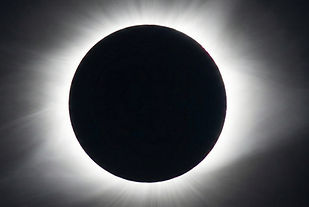
Fase 3: Totalidade (C2 a C3) Filtro: DESLIGADO. Ação: É isso. Verifique o foco (não toque, apenas verifique). Execute sua sequência de bracketing: 1/1000, 1/500, 1/250, 1/125, 1/60... até 1 ou 2 segundos.
Olhe para cima! Não passe o eclipse inteiro olhando para a tela do seu LCD. Veja com seus próprios olhos.
Fase 4: Saída (C3) Filtro: LIGADO (Imediatamente após o segundo Anel de Diamante). Ação: Assim que você vir o segundo Anel de Diamante (o sol reaparecendo), fotografe-o rapidamente e, em seguida, ligue imediatamente o filtro solar. Aviso: Proteger o seu sensor é crucial nesta etapa.
Dicas profissionais
-
O Teste do "Meio-dia Solar": Dias antes do eclipse, saia no mesmo horário em que o eclipse ocorrerá. Pratique montar seu tripé e focar manualmente no sol com seu filtro. Isso ajuda a desenvolver a memória muscular.
-
Disparo remoto: Use um disparador remoto com cabo ou um intervalômetro. Tocar na câmera durante uma exposição de 1 segundo da coroa solar causará trepidação e arruinará os detalhes.
-
Espaço no cartão: Você vai tirar mais fotos do que imagina. Esvazie seus cartões SD/CFexpress antes de começar a fotografar.
-
Ambiente: Se você estiver em um local com queda de temperatura (comum durante a totalidade), fique atento ao embaçamento da lente.